이미지 전처리는 제일 밑에 링크를 걸어 둔 곳으로 가서 보시면 됩니다!
이미지 경로를 train, valid, test 폴더로 정리한 후 데이터 로드
def make_x_dataset(train_path, valid_path, test_path):
    for indx, path in enumerate([train_path, valid_path, test_path]):
        Images = []

        for img_path in os.listdir(path):
            img = load_img(path + img_path, target_size=(IMG_SIZE, IMG_SIZE))
            img = img_to_array(img)
            Images.append(img)

        if indx == 0: x_train = np.array(Images)
        elif indx == 1: x_valid = np.array(Images)
        else: x_test = np.array(Images)

    return x_train, x_valid, x_test


def make_y_dataset(train_path, valid_path, test_path):
    for indx, path in enumerate([train_path, valid_path, test_path]):
        Labels = []

        for img in os.listdir(path):
            if img.startswith('ab_'):
                Labels.append(1)
            else:
                Labels.append(0)

        if indx == 0: y_train = np.array(Labels)
        elif indx == 1: y_valid = np.array(Labels)
        else: y_test = np.array(Labels)

    return y_train, y_valid, y_test
x_train, x_valid, x_test = make_x_dataset(train_path, valid_path, test_path)
y_train, y_valid, y_test = make_y_dataset(train_path, valid_path, test_path)
print(x_train.shape, x_valid.shape, x_test.shape)
print(y_train.shape, y_valid.shape, y_test.shape)
CNN 모델링
from tensorflow.keras.backend import clear_session
from tensorflow.keras.models import Sequential, Model
from tensorflow.keras.layers import Input, Dense, Flatten, Conv2D, MaxPool2D, BatchNormalization, Dropout
clear_session()
model = Sequential()
model.add( Input(shape=(250, 250, 3) )
model.add( Conv2D(filters=64, kernel_size=3, activation='relu', padding='same') )
model.add( Conv2D(filters=64, kernel_size=3, activation='relu', padding='same') )
model.add( MaxPool2D(pool_size=2, strides=2) )
model.add( Conv2D(filters=256, kernel_size=3, activation='relu', padding='same') )
model.add( MaxPool2D(pool_size=2, strides=2) )
model.add( Flatten() )
model.add( Dense(units=128, activation='relu') )
model.add( Dense(units=1, activation='sigmoid') )
model.compile(optimizer = 'adam',
loss = 'binary_crossentropy',
metrics = ['accuracy'])
model.summary()
모델 학습
history = model.fit(x_train, y_train,
                    validation_data=(x_valid, y_valid),
                    epochs=50,
                    # callbacks=[es], # 뒤에 callbacks를 정리한 게시물 볼 것
                    verbose=1)
모델 평가
from sklearn.metrics import classification_report, accuracy_score, confusion_matrixy_pred = model.predict(x_test)# 이진 분류 문제의 경우
threshold = 0.5
y_pred = np.where(y_pred > threshold, 1, 0)print(confusion_matrix(y_test, y_pred))
print(classification_report(y_test, y_pred))
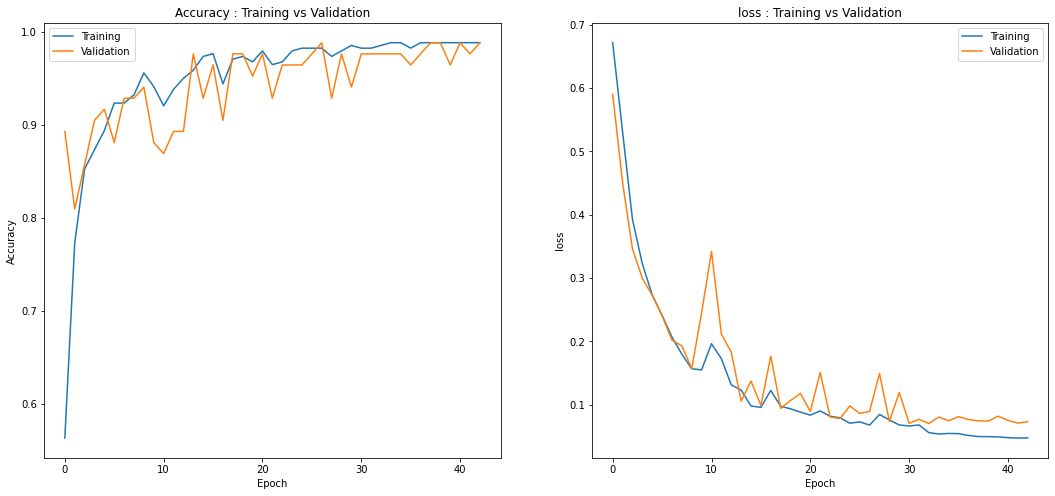
val_loss 와 val_accuracy 시각화
def plot_val_acc_loss(history):
    if not isinstance(history, dict):
      history = history.history

    plt.figure(figsize=(18, 8))

    plt.subplot(1,2,1)
    plt.plot(history['accuracy'])
    plt.plot(history['val_accuracy'])
    plt.title('Accuracy : Training vs Validation')
    plt.ylabel('Accuracy')
    plt.xlabel('Epoch')
    plt.legend(['Training', 'Validation'], loc=0)

    plt.subplot(1,2,2)
    plt.plot(history['loss'])
    plt.plot(history['val_loss'])
    plt.title('loss : Training vs Validation')
    plt.ylabel('loss')
    plt.xlabel('Epoch')
    plt.legend(['Training', 'Validation'], loc=0)
    plt.show()
위에서는 CNN 모델을 만드는 것에 초점을 맞춰서 정리를 했다. 이는 수업을 통해서 충분히 정리를 할 수 있었다.
하지만 이미지 데이터를 저장하고, 분류하고, 복사하고, 전처리 하는 과정에서, 에이블러들마다 다양한 수단을 이용해서 전처리하도록 하여 여러 방법을 학습하도록 유도한 점은 다양한 경험을 할 수 있었으나, 결과적으로 이미지데이터, 프로젝트, 코드들을 유지보수하는 측면에서는 제대로 된 것이 없었다...
이걸 어떻게하면 이쁘게 정리 정돈 할 수 있을까...? 정답을 알려줘!!! 내 나름대로의 논리로 일단 정리한 후에 더 좋은 코드들을 찾아봐야겠다.
KT AIVLE School 7주차 정리 - Colab에서 이미지 파일 정리
colab에서 dataset이 zip으로 된 파일을 받아서 이미지 파일들을 알맞은 폴더에 맞게 정리하는 작업을 정돈해놔야했다. 여러 모듈에 대한 이해도가 부족해서 이렇게라도 해놓아야 다시 쓸 수 있는
kyportfolio.tistory.com
반응형
'Experience > - KT AIVLE School' 카테고리의 다른 글
| KT AIVLE School 7주차 정리 - 전이 학습과 파인 튜닝 (0) | 2023.03.15 |
|---|---|
| KT AIVLE School 7주차 정리 - Colab에서 이미지 파일 정리 (0) | 2023.03.15 |
| KT AIVLE School 7주차 정리 - 상황별 Data Augmentation (0) | 2023.03.15 |
| KT AIVLE School 7주차 정리 - Keras callbacks (0) | 2023.03.15 |
| KT AIVLE School 7주차 정리 - CNN's Layers 정리 (0) | 2023.03.13 |
| KT AIVLE School 6주차 정리 - FI, PFI, SHAP (0) | 2023.03.10 |


댓글